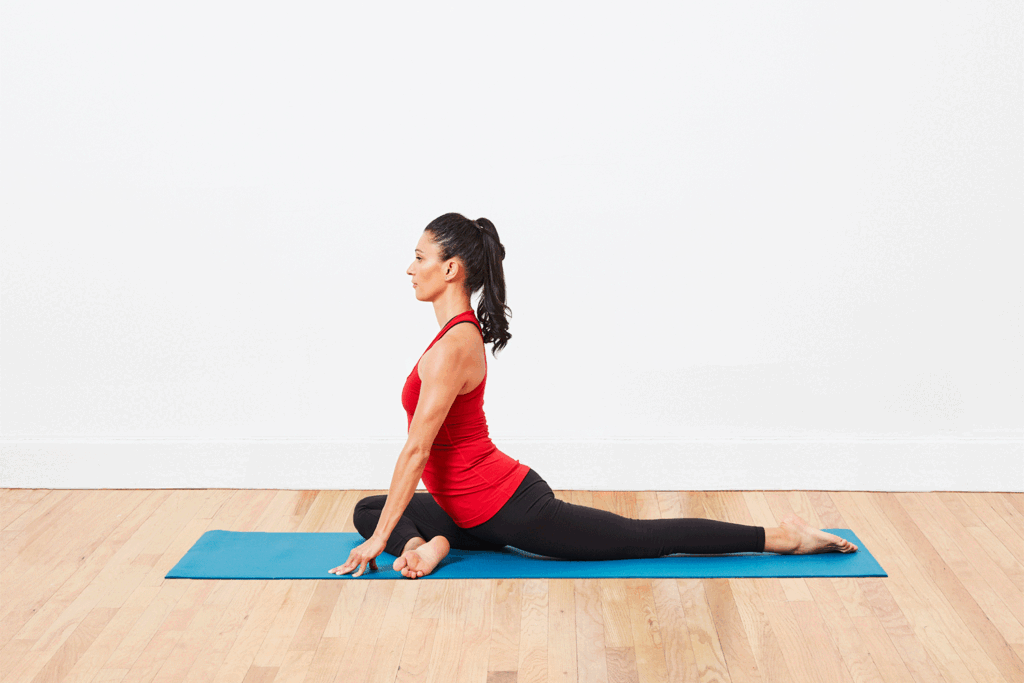
Pigeon pose is a variation of the advanced One-Legged King Pigeon Pose, sharing similar hip alignment and a need for a thoughtful approach. While One-Legged King Pigeon demands precise alignment for its advanced backbend, the forward-bend version of Pigeon can stress the knee and sacrum if done without care. To prevent injury, I start with gradual and safe hip-opening variations. Once your hips are open, crafting a well-balanced Pigeon benefits your hips and lower back. Consistent practice brings ease to sitting, walking, and standing in the lower half.
Benefits Of Pigeon Pose
- Increases hip mobility.
- Utilizes core strength to maintain level hips.
- Calms the mind.
- Targets the psoas muscle and hip flexors.
Instructions (Step-by-Step)
- Start on all fours.
- Bring right knee forward toward right wrist.
- Experiment with placement for a comfortable outer hip stretch.
- Ensure right ankle is in front of left hip.
- Slide left leg back, pointing toes with heel toward the ceiling.
- Scissor hips together, drawing legs toward each other.
- Use support under right buttock if needed to keep hips level.
- Inhale, come onto fingertips, lengthen spine, draw navel in, and open chest.
- Exhale, walk hands forward, lower upper body towards the floor.
- Rest forearms and forehead on the mat.
- Stay for 5 breaths or longer, releasing tension in the right hip.
- To exit, push back through hands, lift hips, and move leg back to all fours.
- Repeat on the other side.
Common Mistakes Of Pigeon Pose
- Rotate your rear leg neutrally instead of outward.
- Tuck toes and lift thigh to square hips.
- Avoid collapsing into the hip of the front bent knee; maintain a square hip position.
- Some struggle to align shins with the front of the mat, risking knee damage.
- Tuck a folded towel under the right buttocks and thigh to realign hips and knees.
- This reduces pressure and minimizes the risk of knee damage over time.
Precautions Of Pigeon Pose
- Do NOT perform if you have low or high blood pressure.
- Avoid if affected by insomnia, hypertension, or migraines.
- Do NOT practice with serious low back or neck injuries.
Modifications
- Excessive tightness and limited mobility in the hips and thighs.
- Excessive discomfort in the knees.
- Weakened or underdeveloped core.
- Excessive tension or pinching in the back.
- Discomfort or restriction in the shoulders.
Variations
- Transform it into a backbend by keeping the arms straight and lifting the chest instead of lowering the head to rest on the mat.
- Explore the Figure Four version:
- Sit with knees bent, feet flat, arms behind for support.
- Cross right ankle over left knee, keeping the foot flexed.
- Walk the left foot closer to your hip for a deeper stretch.
- Alternatively, try the Figure Four lying on your back:
- Cross right ankle over left knee.
- Hold the back of your left thigh, drawing it towards you.
- Repeat on the other side.
Pigeon Pose For Beginners
Tips For Beginners
- Boost mobility by squeezing knees together and actively engaging the glutes.
- Increase stretch intensity by bringing the front shin more parallel to the top of the mat.
Practice Pigeon Pose For Beginners By Following These Steps
- Start in Downward Facing Dog.
- Lift right leg into Down Dog Split.
- Bend right knee and bring it forward, placing it outside your right hand.
- Left knee to the mat, ensuring the foot points straight back.
- Square hips to the front of the mat.
- Use padding under the right hip for comfort.
- Optionally, bend forward over the right leg, keeping hips square.
- To release, come back up with hands in line with hips.
- Step back to Downward Facing Dog.
- Repeat on the other side.
Learn this pose perfectly under our certified yoga trainer. Join our online yoga classes now. Browse More Hip-Opening Yogasanas and complete Yogasanas Library.


